
Pocket Artist 3 is a 24-bit color graphics editor for Windows Mobile 2003 for Pocket PC, Pocket PC 2002, Pocket PC 2000 and Handheld PC 2000.
Pocket Artist provides the desirable features found in popular graphic packages of today, with the constraints of mobile devices in mind. Program memory requirements depend on the dimensions of the image in question. Pocket Artist 3 improves upon memory usage requirements through the use of memory swap files that can be stored on a storage card.
Pocket Artist is distributed as a self-extracting and self-installing EXE. Simply download the EXE to your desktop computer and run it to start the automatic installation to your PDA.
We recommend users to have about 4MB free on their desktop machines
and 2MB free on their Windows CE devices. After installing,
Pocket Artist will add a shortcut to the Start Menu.
Graphics editing and drawing is done at the pixel level, in full 24-bit (RGB) quality, although the visual appearance of the picture may vary depending on the device. PDAs with 16-bit displays will convey greater image quality than those with 8-bit displays. Older CE devices with 8-bit (256-color) displays have 16-bit (65,536 colors) drivers available from the hardware manufacturer. Check with your hardware manufacturer for more details
To install Pocket Artist, double-click the PocketArtist3.exe file from the download page. Upon installing, the program will appear on your mobile device's Start Programs menu. Pocket Artist is then installed on your device and desktop and activated
for a 30-day demo. If you would like to continue using Pocket Artist 3 past
the 30-day trial period, you must purchase it from
Conduits Direct.
Programs menu. Pocket Artist is then installed on your device and desktop and activated
for a 30-day demo. If you would like to continue using Pocket Artist 3 past
the 30-day trial period, you must purchase it from
Conduits Direct.
Uninstalling Pocket Artist on the device: tap StartSettingsRemove
Programs, tap Pocket Artist and tap Remove. On the desktop, tap
StartSettingsControl PanelAdd Remove Programs, click Pocket
Artist and click Remove.
 After initializing the program, you will see this screen. It provides
a rich feature set without taking too much room for toolbars
and menus. This allows as much space as possible to be
dedicated to drawing.
After initializing the program, you will see this screen. It provides
a rich feature set without taking too much room for toolbars
and menus. This allows as much space as possible to be
dedicated to drawing.
The main white area is the canvas
in which you draw. Scroll bars appear as required to the right
and bottom of the canvas and allow you to pan around the entire
image.
At the bottom of the screen you will find the main toolbar. This toolbar allows you to access the main menu and drawing tools.
Four other toolbars may be visible at any time. These are the Layer Toolbar, Channel Toolbar,
Tool Options, and Color Picker. The Layer Toolbar and Tool Options are shown here. You can show or hide these toolbars by using the View menu.
Main Toolbar

Tapping "Menu" will allow access to the full
main menu. The next two buttons are Color and Brush Shape.
The middle five buttons allow selection of a tool. Tools are grouped into five
categories, from left to right: Drawing Tools, Adjustment Tools, Selection Tools, Viewing Tools
and Text/Shape Tools. The last button on the toolbar is Undo. Tapping this button immediately performs an Undo (or a Redo) of the last action.
The Color button shows the current foreground color in the top left square,
and the background color in the bottom right. Tapping the middle of the Color button will show or hide the Color Picker toolbar and allow selection of a color. Tapping the top right of the button on the two arrows swaps the foreground and background colors. Tapping the bottom left corner of the button on the black and white rectangles resets the foreground and background colors to black and white respectively.
 The Brush Shape button shows the shape and size of the currently selected brush. A number is shown below the brush shape, which gives the dimensions (in pixels) of the brush. Tapping the Brush Shape button pops open a window to select a different brush from the current brush set.
Tap-and-hold on the Brush Shape button to use a different brush set (ABR file). Pocket Artist 3 will use any ABR file created by Adobe Photoshop and placed in the Brushes directory on the CE device. It will also use any BMP files in the same directory as brushes in the Default Brushes set.
Five tool buttons are used to provide quick access to any tool. Each button governs a set of related tools: Drawing Tools, Image Tools, Selection Tools, Viewing Tools, and Text/Shape Tools. Only one of these buttons will be highlighted at a time to indicate the current tool. Selecting this button will show a menu of related tools to choose from. Tapping any other tool button will immediately switch to that tool. Tap-and-hold on any tool button to quickly show the tool menu for that button.
Other Toolbars
The Layer Toolbar at the top of the screen is described fully in the Layers & Masks chapter. The Channel Toolbar (not shown) is described in the Alpha Channels chapter.
The Tool Options toolbar appears above the main toolbar, and changes appearance and functionality depending on what tool is selected. This functionality is described in Painting Tools.
 The Color Picker toolbar allows rapid and precise selection of a foreground color. On the left is a color spectrum. Tapping anywhere in this color spectrum will allow selection of the corresponding color. White and black boxes on the right side of the spectrum allow full white and black to be selected easily.
The box next to the color spectrum opens a swatch of standard colors to choose from. This swatch is a 216-color web-safe palette from VisiBone.
Three boxes to the right display the red, blue, and green color components of the currently selected color. The color components range from 0 to 255. Tapping on any color component will pop open a window to allow fine adjustment of this value. The value may be set using a slider at the bottom of this window or by tapping any of the 256 color boxes in the window. The color boxes show the final color that will result from the adjustment.
At the very right side of the color toolbar is the mode selection popup menu. This enables you to select a standard RGB color chart, HSB (Hue, Saturation, and Brightness) color chart and Grayscale color modes. For each, a "Web-Safe" mode can be selected that restricts all colors to a 216-color web-safe palette.
When in HSB color mode, the three numbered boxes represent the hue, saturation and brightness of the current color. When in grayscale
color mode, only one box is visible, representing the luminosity of the current color.
Tapping "Menu" will load the following choices:
Main Menu Items
Image Menu

- New: starts a new document. Will prompt to save the current document.
- Open: opens a document. Also will prompt.
- Save: saves the document. If you have saved
the image previously, or if you loaded the current image
and have edited it, this command will save it without a
prompt.
- Save As: saves the document. This will prompt for
a file name and saving type.
- Close: closes the document. Will prompt to save changes.
- Revert: loads the last saved iteration of current document.
- Recent Files: holds a list of recently opened, edited or saved files.
- Tools: fully described in the Advanced Tools
section.
- Exit: (HPC only) exits Pocket Artist 3.
- Minimize: (PPC only) minimizes Pocket Artist, just like tapping the Smart Minimize button in any other Pocket PC application.
Edit Menu

- Undo/Redo: undoes the last command, whether it be a paint
stroke or a document command (such as resizing the image). If you have
just selected to Undo, the command will Redo the undone operation.
- Step Backward: same as Undoing a step, but allows you to
keep stepping backward in your image editing history.
- Step Forward: same as Redoing one step in your image editing history.
- Cut: takes the current selection, moves it to the
clipboard (for version 3, the Pocket Artist and system clipboards are unified),
and erases the current selected area of the document.
- Copy: takes the current selection and copies it to the
Pocket Artist clipboard, retaining the selection and the
document.
- Copy Merged: grabs all the layers as they are shown onscreen
and copies it to the clipbaord.
- Paste: creates a new layer and copies data from the
clipboard to a new layer.
- Clear: clears the current layer (or the current selection)
by filling with the background color or erasing layer data.
- Transform: rotate, resize or flip the current layer or selection. If performed on the background layer, it will affect the entire document.
- Fill: fill the current layer or selection with the foreground color, background color or texture. Variable opacities and blending modes can be used. The "Preserve transparency" option will keep the current layer's alpha information intact when filling. If a texture is selected, another prompt for the
texture file to use will open.
- Stroke: will outline a selection in various ways. Variable width and location (inside, centered, outside) settings can be used, as well as blending modes.
- Define Pattern: uses the current selection as the current pattern for the Pattern Stamp tool.
- Preferences: edit Preferences & Memory.
- About Pocket Artist: shows the version screen and copyright information for Pocket Artist and the installed plugins.
View Menu
- Zoom In / Out / 100%: visually zooms in and out on the document. Zoom 100% resets the view.
- Zoom to Fit: zooms in or out to show the document as large as possible while still fitting it into the document area.
- Quick Zoom: a submenu of zoom increments from 12.5% to 1600%.
- Layer Toolbar / Channel Toolbar / Color Picker / Tool Options: toggle the visibility of the corresponding toolbar. A checkmark appears next to toolbars that are visible.
- Information: pops up a movable window that displays information on the stylus position and the color beneath it.
- Full Screen: switches Pocket Artist into a full screen mode, whereby the editing canvas fills the entire device screen.
- Grid: toggles the Grid, which is useful in guiding the stylus on the canvas with precision.
- Guides: toggles Guides, which help in precision (like the Grid). Each guide is created by
dragging from the Ruler to the canvas, and consists of either a vertical or horizontal line that stylus motion is "snapped to" when painting or using other tools.
- Ruler: toggles the Ruler, which shows the range of pixels that is onscreen at any time.
- Snap To Grid, Guides: uncheck these options to keep the Grid and Guides visible, but to not perform any stylus precision snapping.
- Lock Guides: normally, the Move tool can be used to reposition a Guide. Locking the guides will not permit the Move tool to perform that action.
- Clear Guides: resets and clears all guides that have been created on the document.
Adjust Menu - also see Photography/Level Tools
- Levels...: adjusts the black, gray and white levels of the layer/selection. See Photography/Level Tools.
- Auto Levels: automatically adjusts the levels to have a uniform intensity across all levels and color balances.
- Auto Contrast: automatically adjusts the levels to have a uniform intensity across all levels without altering color.
- Fill Shadows: for images that have large dark areas, it expands the dark region to higher intensities to bring out detail. See Photography/Level Tools.
- Fix Overflash: for images that have large bright areas, it expands the bright region to lower intensities to bring out detail.
- Bright/Contrast: a window will allow you to adjust the brightness and contrast levels for the layer or selection. As these levels are modified, changes take place in the document window immediately.
- Hue/Saturation: adjust the hue, saturation and lightness levels for the layer or selection. As these levels are modified, changes take place in the document window immediately.
- Color Curves: adjust color levels of the layer or selection. All colors may be affected or just red, green or blue components.
- Desaturate: converts color image to grayscale.
- Invert: color values for the layer or selection will be inverted. This changes black to white, red to cyan, green to magenta, and blue to yellow.
- Image Size: scales the image up or down in size.
Constrain proportions will keep the resulting aspect ratio the same as the original. The resampling algorithm may be selected. Each option offers a different tradeoff between quality and speed. On this screen you can also control the print resolution of the image, which is saved for certain
image formats such as PSD, JPEG and BMP. Print resolution can be specified either in dots-per-inch or
dots-per-centimeter.
- Canvas Size:
 changes the size of the canvas without scaling the image. The Anchor area specifies how you would like the pre-affected image to be placed in the new image -- in this case it would be aligned in the middle. If the height and width are decreased,
the image would be cropped on each side.
changes the size of the canvas without scaling the image. The Anchor area specifies how you would like the pre-affected image to be placed in the new image -- in this case it would be aligned in the middle. If the height and width are decreased,
the image would be cropped on each side.
- Crop Image: shrinks the current image, cropping it to the bounds of whatever selection you currently have.
Select Menu
- Deselect: defloats and removes the selection.
- Select All: selects the entire layer.
- Select Inverse: inverts the current selection so areas of the image that were selected are no longer selected and vice versa.
- Defloat: if a selection contains colors that were picked up during a Move operation, the colors are merged with the underlying layer.
- Feather: blurs the selection and creates a softer edge to the selection area. Colors data is not modified.
- Modify Border, Expand, Contract: adjusts the selection to either expand, contract the selected area or to select the border of the currently selected region.
- Save Selection: stores the current selection as a new channel. See Alpha Channels for more information.
- Toggle Outlines: the "marching ants" that appear as the
boundary to the current selection will be hidden or shown
by selecting this menu option.
Filter Menu
- Filters: contains filters that may be applied to a layer
or selection. They are discussed in further detail in the Filters chapter.
- Repeat: repeats the last run filter with the same settings.
- Fade Last...: steps back to before the last Filter was applied, and reapplies the filter with a new blending mode and opacity. Normally, all Filters apply themselves as a "100% Normal" function; this enables greater control.
For example, add white text on a black background, and use the Gaussian Blur filter to blur it. The result is a blurry text image. Now, tap Fade Last, and pick the Difference or Exclusion blender. This combines the before (non-blurred) and after (blurry) images together, and computes the difference between the two, which results in glowing edges.
Another example would be a "Soft Focus" effect, by using the Gaussian Blur on any layer, and then using the Fade Last command to apply the blur with the Lighten or Hard Light blender.
 Pocket Artist 3 can open and save images in a variety of formats, including PSD, GIF, JPEG, PNG, BMP and 2BP
formats. PSD is the only format which can save multi-layer images, so saving a multi-layer image will actually merge the current document on-the-fly when writing to the desired format.
Pocket Artist 3 can open and save images in a variety of formats, including PSD, GIF, JPEG, PNG, BMP and 2BP
formats. PSD is the only format which can save multi-layer images, so saving a multi-layer image will actually merge the current document on-the-fly when writing to the desired format.
Pocket Artist features an image browser when opening images, which displays thumbnails of all documents found in the current folder targeted. The zoom size can be adjusted via the buttons on the toolbar.
 When starting a new document, this is the window that
is shown. You can adjust height, width and background color for the document. The preset selection allows you to quickly select typical document sizes.
When starting a new document, this is the window that
is shown. You can adjust height, width and background color for the document. The preset selection allows you to quickly select typical document sizes.
 Save or Save As may prompt for a filename by using the window shown. The desired name of the document is entered in the top line. You may specify a file type by using the drop-down box on the third line. Pocket Artist uses a customized Save prompt which allows you to store your images in any folder (unlike the standard Pocket PC Save prompt, which only stores files in a My Documents folder in RAM or on a Storage Card).
 If your document requires palettization, such as when saving to GIF, or 8-bit PNG and
BMP formats, a Palette wizard will appear after tapping OK.
If your document requires palettization, such as when saving to GIF, or 8-bit PNG and
BMP formats, a Palette wizard will appear after tapping OK.
The preview image is of the image, with the current layer visibility
taken into effect. The color palettes that are created by Pocket Artist will be based
on this composite image. Uncheck the "Preview" box to visualize a before-and-after
effect of the palettization.
To the right of the preview image are the attributes for the palette. You can
restrict the number of colors by adjusting the first entry field. Next is the Palette
type; if you are using a document that previously had a palette (such as a GIF file
you opened), picking Previous here will use the old palette. The next choice,
Optimized, will perform a quantization algorithm on the 24-bit color composite
image to achieve a palette with the desired number of colors. The next two choices,
Web-Safe and Standard use built-in palettes for either web use, or
Windows display. The last choice, Custom, can be used to set your own palette.
You can also adjust any of the generated or built-in palettes in the same manner, by
tapping Palette Edit at the bottom.
The Matte command refers to how to handle transparency in the document.
Since palettized images cannot have a variable alpha channel, and can only have
a single solid area for transparency, Pocket Artist 3 provides some options for how
to handle midrange transparency values, such as those found on soft edges. In the
example shown, we have chosen a Black Matte that produces a small black outline
around the entire image; it depends on where you intend to use the resulting image.
Some advanced palette commands are to enable Diffusion, which scatters out the
color reduction and eliminates "color banding" of the resulting image. Commands
on the Palette menu, such as Transparency, allow manipulation of the palette
to fine tune the results. You can also load and save palettes from this screen.
Tapping OK on the palette screen will save your image in the location previously
specified.
Again, the main interface for Pocket Artist 3 is shown to
the right.
The Pocket Artist tool popup menus are as follows:
When any tool is selected, the Tool Options toolbar shows the status
and options for that particular tool. The toolbar appears above the main toolbar
at the bottom of the screen. If it is not visible, you may display it by using the View menu.
Below is a description of Drawing, Image, and Text/Shape tools.
Selection tools are explained in the Selections chapter.
The last button on the toolbar is the Undo tool, which performs an Undo step. If you have
already performed an Undo step, it performs a Redo action. This behavior is customizable
in the Preferences; for example, you can make the button always perform an Undo action.
Drawing Tools
 Paintbrush: this is the standard paintbrush. By clicking
and dragging in the document window, you paint with the
foreground color using the current brush. You can also
hold down Shift (HPC) or Action (PPC) and click, and it will
draw a line from the last point of which you drew. The
Sketch checkbox causes the brush effect to get darker and darker
as you go over the same area. A blending mode may be selected to
cause the brush strokes to combine into the layer in a non-standard way. The opacity slider will affect how much ink is combined with the layer.
Paintbrush: this is the standard paintbrush. By clicking
and dragging in the document window, you paint with the
foreground color using the current brush. You can also
hold down Shift (HPC) or Action (PPC) and click, and it will
draw a line from the last point of which you drew. The
Sketch checkbox causes the brush effect to get darker and darker
as you go over the same area. A blending mode may be selected to
cause the brush strokes to combine into the layer in a non-standard way. The opacity slider will affect how much ink is combined with the layer.
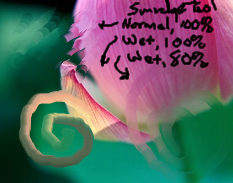
In the example above,
the top stroke is the Paintbrush at 20% opacity in normal mode.
As you sketch over the same area, it doesn't get any
darker than 20%. In Sketch Mode (the second stroke),
it gets darker, giving the appearance of a pencil
sketch. In the third example, the
Blending Mode has been set to "Multiply" (which in effect
darkens the image), and the Sketch Mode keeps darkening
as one goes over the same area. The bottom row
of strokes are examples of varying opacity in Normal Mode
(the first five strokes) and Sketch Mode (the last six strokes).
Pencil: works very much like the paintbrush tool, but treats the selected brush as if it has hard edges. There is no softening effect around the perimeter of a pencil stroke.
Airbrush: works like the paintbrush tool, creating a paint spray effect by varying the opacity of the brush during the brush stroke. Select Splatter to vary the spacing of the brush
stroke as well, creating a more random effect. Pressure adjusts the
opacity range, and therefore how dark or light the entire effect is. The Blending Mode can be adjusted and works the same as for the
paintbrush tool.
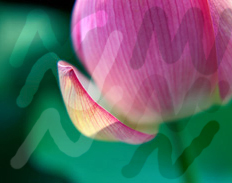
 Clone Stamp: takes one area of the image and paints it into another area.
By holding down Action (PPC) or Shift (HPC) and tapping,
you set the "source point." Then, let go of the
key and all strokes after that act as a stamp coming
from the source point. If Aligned is set, the first brush
stroke after setting the source point defines the "target point,"
and each brush stroke after that reveals a reflection of
a different part of the picture. If Aligned is not
set, the tap at the beginning of each brush stroke
defines another target point. The Blending Mode and
Opacity will affect the paint in the usual manner.
Clone Stamp: takes one area of the image and paints it into another area.
By holding down Action (PPC) or Shift (HPC) and tapping,
you set the "source point." Then, let go of the
key and all strokes after that act as a stamp coming
from the source point. If Aligned is set, the first brush
stroke after setting the source point defines the "target point,"
and each brush stroke after that reveals a reflection of
a different part of the picture. If Aligned is not
set, the tap at the beginning of each brush stroke
defines another target point. The Blending Mode and
Opacity will affect the paint in the usual manner.
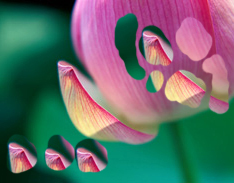
In the example above, the
source was set on the cusp of the petal to the left of the
main flower. The area in the top right shows the result of
using an Aligned brush. The area in the bottom left was
created without Aligned checked.

 Pattern Stamp: paints with an external picture as its source.
Click the
"Tex" button to open the Texture window
(shown at right). A list of images found in the
"Textures" subfolder of the Pocket Artist
install folder will be shown here. Selecting one
will show a preview of the image. Tap OK
to accept the image and close the window. Brush strokes
on the image will now paint using the selected image.
Pattern Stamp: paints with an external picture as its source.
Click the
"Tex" button to open the Texture window
(shown at right). A list of images found in the
"Textures" subfolder of the Pocket Artist
install folder will be shown here. Selecting one
will show a preview of the image. Tap OK
to accept the image and close the window. Brush strokes
on the image will now paint using the selected image.
"Use as Bump Map" causes the selected image to act
as a rough surface on which the foreground and background
colors are combined. For example, you may use the
canvas texture with any light and dark foreground and background
colors to create a textured surface.
With Align unchecked, the texture is placed relative to the
beginning of each brush stroke. The Align option
places the texture consistently across the entire canvas and
is often used when drawing a background texture. The Blending Mode and Opacity affect the way the texture
is drawn on the canvas in the usual manner.
Gradient: fills the selected area or current layer
with continuous blends between colors. Select a gradient file
using the arrow button at the far left of the options bar. Each gradient file contains one or more gradients.
Select a particular gradient using the listbox to the right
of the arrow. Each gradient defines a transition between
several colors and levels of transparency along a line.
A gradient can fill an area using several methods. Tap the
gradient button in the center of the tool options to select
Linear, Radial, Sweep, Bar or Diamond methods. You may
also select Reverse and Opaque options using the same button.
The Reverse option reverses the order and position of colors
along the gradient line. The Opaque option forces the entire
gradient to be drawn without any transparency, ignoring the
transparency cues defined in the gradient. This option is
independent of the Opacity option. The Blending Mode and
Opacity options affect the entire gradient as it is
painted over the underlying layer.
After selecting appropriate options, tap-and-drag in the canvas
area to create a Definition Line and draw a gradient. The
Definition Line is used to line up the gradient and draw it
in the appropriate place. The interpretation of the Definition
Line depends on the fill type.
 Each gradient fill type is illustrated in the picture to the right.
The gradient used to generate the picture blends from blue to
red and then to yellow. The Linear fill was generated using
a Definition Line drawn from the lower left of the rectangle
to the upper right. All other fills were generated using
a Definition Line drawn from the center of the rectangle to
the upper right.
Each gradient fill type is illustrated in the picture to the right.
The gradient used to generate the picture blends from blue to
red and then to yellow. The Linear fill was generated using
a Definition Line drawn from the lower left of the rectangle
to the upper right. All other fills were generated using
a Definition Line drawn from the center of the rectangle to
the upper right.
Pocket Artist 3 comes with a large collection of gradient files,
each of which contains several individual gradients. All
gradients are stored in a GRD file, in a format that conforms
with Adobe Photoshop. The arrow button at the left of the
gradient options bar shows a list of all GRD files in the
"Gradients" subfolder of the Pocket Artist install folder, e.g.
"(My Pocket PC)\Program Files\Conduits\Pocket Artist\Gradients". Additional GRD files can be created on
a desktop PC using Adobe Photoshop. After placing them in the
Gradients directory on the device, they will be available for
use in Pocket Artist.
Paintbucket: fills a region of the picture with the
current foreground color. Tap on the
canvas somewhere in the region you wish to fill. All
pixels that are connected to each other and have
a similar color are filled. The "line-smoothing" button enables
Antialiasing and softens the edge of the fill. The "Tol."
option changes the tolerance of pixel color differences
before the edge of the region is determined. The Blending
Mode and Opacity levels affect the foreground paint just
as they do for a paintbrush stroke.
Image Tools
Eyedropper: sets the foreground
color to a sample color from the image. Tap the canvas
at any point to sample that color. The sampling technique
may obtain the color from a single pixel or from a 3x3 or
5x5 surrounding box. Colors from a box may be evenly weighted
(Average) or the central pixels may be given more weight (Weighted). The Merge option causes the eyedropper to
sample from the visible merged image. If unchecked, the
eyedropper samples only from the selected layer.
Eraser: works in reverse from the paintbrush. On the base layer of a document it draws with the background color,
and on any other layer it erases the colors it runs over.
 Dodge/Burn: works as a paintbrush that lightens or
darkens parts of an image. Select Dodge to lighten and Burn to darken. Select Shadows, Midtones or Highlights to affect that color range. The exposure level is similar to an opacity level for a brush.
Dodge/Burn: works as a paintbrush that lightens or
darkens parts of an image. Select Dodge to lighten and Burn to darken. Select Shadows, Midtones or Highlights to affect that color range. The exposure level is similar to an opacity level for a brush.
Above, the
first column of strokes is Dodge, the second is Burn.
The top row is affecting Highlights, the second is
affecting Midtones, and the third is affecting Shadows.
Note how the Highlight Dodge affected the pink flower
much more than the Midtone Dodge, and how the Shadow
Dodge affected the dark area much more than the Highlight
Dodge.
Blur/Sharp: blurs or sharpens the image in
the area of a brush stroke. The tool works similarly
to the paintbrush. The Pressure determines how much
blurring or sharpening to perform with each stroke.
 Smudge: akin to taking a wet
finger to your painting. Repeated strokes over an area will blur and smudge
that area. The Paint option allows you to drop
one paintbrush full of paint onto the canvas before each smudge
stroke. The Pressure level determines how much paint is
dragged and pushed around the canvas. Levels of about 50% are
the most effective. The paint that is affected by smudge
may be modified through a Blending Mode for interesting
effects.
Smudge: akin to taking a wet
finger to your painting. Repeated strokes over an area will blur and smudge
that area. The Paint option allows you to drop
one paintbrush full of paint onto the canvas before each smudge
stroke. The Pressure level determines how much paint is
dragged and pushed around the canvas. Levels of about 50% are
the most effective. The paint that is affected by smudge
may be modified through a Blending Mode for interesting
effects.
Red-eye Brush: eliminates red-eye from
an image, while retaining lightness and darkness
specular highlights. The tool will draw over
selected parts of the image, replacing it with
the foreground color. The "Replace mode" controls
what to replace, either Red-toned pixels, the
pixels that match the current background color, or
whatever color you first tap on with the tool (the
"Pick-up Color" mode).
Cleaning Brush: removes grain and specks
from an image, with adjustable pressure and radius
(noise level).
ViewingTools
 Move: moves the area of a picture under
a selection if a selection is active or it will move the entire
layer. If a selection exists, using this tool will "float" that
selection by cutting the area of the image the selection surrounds
and putting that data in a "floating selection." This floating
selection exists independently of the underlying layer and may
continue to be moved around without destroying data underneath it.
It will not be merged with the underlying layer until it is
Defloated or Deselected with the corresponding menu items.
Move: moves the area of a picture under
a selection if a selection is active or it will move the entire
layer. If a selection exists, using this tool will "float" that
selection by cutting the area of the image the selection surrounds
and putting that data in a "floating selection." This floating
selection exists independently of the underlying layer and may
continue to be moved around without destroying data underneath it.
It will not be merged with the underlying layer until it is
Defloated or Deselected with the corresponding menu items.
Tap the "Move" button to perform a numeric move (in pixels).
If there is no selection, tap-and-drag in the canvas area to
move the entire layer. If the layer is a base (background) layer,
it will be changed into a non-base layer first. See the Layers & Masks chapter
for details.
Hand / Pan: pans around the image as you
drag the stylus across the screen. Various buttons can control zoom settings (see below).
Zoom: zooms in on a specific area that you
draw on the screen and can also zoom out. The buttons on the Options bar perform
quick zooms to various levels. The "Print Size" zoom button uses the DPI of the current
document to match the device's screen DPI setting.
Text/Shape Tools
 Draw Text/Text Outline: enters text into Pocket Artist. Draw Text will
make a new floating selection on the document
with the text entered in the current foreground
color, while Text Outline will simply make a selection
based on the text you enter. Options include
font name, size, bold, italic and whether the
font should be antialiased. There is an experimental
"angle" feature where the text can appear at an angle.
Draw Text/Text Outline: enters text into Pocket Artist. Draw Text will
make a new floating selection on the document
with the text entered in the current foreground
color, while Text Outline will simply make a selection
based on the text you enter. Options include
font name, size, bold, italic and whether the
font should be antialiased. There is an experimental
"angle" feature where the text can appear at an angle.
By simply tapping
(when the Text tool is selected) in the document,
the "Enter Text" dialog will open and prompt for the
text. Tapping OK will float the text (or outline)
on the document. By tapping and dragging a rectangle
on the document, the same thing will happen, except
it bypasses Pocket Artist's auto-calculate of the text
rectangle. This is useful if you would like to chop
off the text, or when working with text at an angle (Pocket
Artist does not compute the needed rectangle appropriately).
Since text is added as a Floating Selection, you can also
rotate and size it after the fact via the Edit
Transform Numeric command.
 To the right is a sample of what you can do with the Text
tool. The first line is simply "Pocket Artist" in bold italic
Tahoma. The second line is the same, except with antialiasing
turned on. The third was two instances of the text tool. The
first was set to gray and blurred after placement, and then
black text on top, creating a drop shadow effect. The last example
shows text on a layer with the different blending mode, while the
layer below it contains gray smudges.
To the right is a sample of what you can do with the Text
tool. The first line is simply "Pocket Artist" in bold italic
Tahoma. The second line is the same, except with antialiasing
turned on. The third was two instances of the text tool. The
first was set to gray and blurred after placement, and then
black text on top, creating a drop shadow effect. The last example
shows text on a layer with the different blending mode, while the
layer below it contains gray smudges.
Draw Line: tap-and-drag to draw a line between two points. The "line-smoothing" button determines whether the edges of the line are smooth. You may select a line width via the input box. Blending mode
and Opacity operate as normal.

Rectangle: tap-and-drag to create a rectangle on the
document. Hold down Shift (HPC) or Action (PPC) to
make the rectangle a square. If the checkbox is unchecked, the
rectangle will be filled with the foreground. Check the box, and
select an outline width to create an
outlined rectangle instead. Opacity and Blending Mode operate as normal.
Ellipse: works similarly to the Rectangle
tool. Hold shift or Action to make a circle. The "line-smoothing" button option enables Antialiasing and softens the edge of the ellipse.
Polygon: can draw any polygon. Tap at each
vertex of the
desired polygon, moving clockwise or counterclockwise. Tap at
or very near the first point and the polygon will be drawn. The options are identical to the ellipse tool.
 An example of the different shapes and their settings is shown to
the right.
An example of the different shapes and their settings is shown to
the right.
Pocket Artist 3 features several interactive ways to adjust the colors of the
image (or selection) as a whole. These items are located on the Adjust popup menu.
 Levels: adjusts intensity levels of the layer or selection,
for all channels and/or each channel individually. The current intensity levels are shown
in the top graph, and the output intensities are shown in the lower graph.
Levels: adjusts intensity levels of the layer or selection,
for all channels and/or each channel individually. The current intensity levels are shown
in the top graph, and the output intensities are shown in the lower graph.
By dragging
the left slider in the top graph, you adjust the new black point of the image, which effectively
darkens the image, by setting all values below it to black. Dragging the right slider in
the top graph, you adjust the new white point of the image, which effectively brightens
the image, by setting all values above it to white. Dragging the middle slider in the
top graph will adjust the gray level of the image, which will adjust all the midrange
values in a smooth form (akin to adjusting the gamma of the image).
By dragging the sliders on the lower graph, you adjust the output black and white
values of the output. By dragging these away from the preset black/white areas,
you bind the upper graph's black/white adjustments to the new lower graph's values,
which lead to further improvements in level adjustment.
 Color Curves: adjusts color levels of the layer or selection. All colors may be affected or just red, green or blue components.
The adjustment is represented by a graph with input values along the X-axis, and output values along the Y-axis. The curve starts out with a rising diagonal line. This indicates no change. Adjust the curve by drawing on the graph. The example shown above causes dark and midrange colors to be darkened. All changes are shown in the document window immediately.
Color Curves: adjusts color levels of the layer or selection. All colors may be affected or just red, green or blue components.
The adjustment is represented by a graph with input values along the X-axis, and output values along the Y-axis. The curve starts out with a rising diagonal line. This indicates no change. Adjust the curve by drawing on the graph. The example shown above causes dark and midrange colors to be darkened. All changes are shown in the document window immediately.
 Brightness / Contrast: adjusts the brightness and contrast
of the image as a whole. Increasing contrast shifts color values to the full shadow and full
light extremes, while decreasing contrast shifts the color values to mid-way (gray).
Increasing or decreasing the brightness shifts all colors up or down in their
intensity level.
Brightness / Contrast: adjusts the brightness and contrast
of the image as a whole. Increasing contrast shifts color values to the full shadow and full
light extremes, while decreasing contrast shifts the color values to mid-way (gray).
Increasing or decreasing the brightness shifts all colors up or down in their
intensity level.
 Hue / Saturation: adjusts color balance of the layer
or selection. By adjusting the hue, you tint the image in the visible spectrum of color. Adjusting the saturation will either increase the color balance to a "pure" hue, or decrease
the color balance to a grayscale shade. Increasing or decreasing the lightness will adjust
the colors from black, to the current intensity, to white.
Hue / Saturation: adjusts color balance of the layer
or selection. By adjusting the hue, you tint the image in the visible spectrum of color. Adjusting the saturation will either increase the color balance to a "pure" hue, or decrease
the color balance to a grayscale shade. Increasing or decreasing the lightness will adjust
the colors from black, to the current intensity, to white.
Other Photo Adjustments
The Auto Levels and Auto Contrast tools work by attempting to preset
these level adjustment variables to values that will smooth out the intensity
of the image to fit a "normal" distribution -- that is, not too light and not
too dark.
The Fill Shadows and Fix Overflash tools work with similar algorithms,
though their intent is either to "pull up" dark areas of the image, or "pull down"
light areas of the image, in order to obtain more detail in a picture.
The Desaturate command removes the color from the image (or current
selection), and the Invert command flips the color intensity of each
pixel--black becomes white, red becomes cyan, and so forth.
 Pocket Artist 3 has added the ability to adjust metadata for an image.
Metadata is a collection of text items that describe the image itself, such
as the artist or title of the image. The common standard to store this information
in images is referred as the IPTC Captions method. Pocket Artist supports
many of the common facets of this standard.
Pocket Artist 3 has added the ability to adjust metadata for an image.
Metadata is a collection of text items that describe the image itself, such
as the artist or title of the image. The common standard to store this information
in images is referred as the IPTC Captions method. Pocket Artist supports
many of the common facets of this standard.
Another metadata collection is the EXIF standard, which is mainly used by digital
cameras to record attributes of the photo that has been taken, such as the
camera model, exposure settings and other attributes of that sort. Pocket Artist
reads and retains IPTC and EXIF information when opening, editing or saving JPEG and PSD images.
 The metadata editor is launched by tapping Image Tools Edit Captions / Info.
The different metadata items are grouped into different tabs along the bottom:
General, Keywords, Categories and Origin. The Exif information is stored on the last
tab. To edit any of these items, simply tap in a space and enter in the desired data.
The metadata editor is launched by tapping Image Tools Edit Captions / Info.
The different metadata items are grouped into different tabs along the bottom:
General, Keywords, Categories and Origin. The Exif information is stored on the last
tab. To edit any of these items, simply tap in a space and enter in the desired data.
When adding data to images, it is common to reuse certain attrributes, such as the
Copyright and Author information. Pocket Artist can Load, Save and Append any
metadata by using the menu items on the Information menu at the bottom of the
screen. The Load and Save commands read and write Pocket Artist Information Chunks (.AIC files,
a proprietary file format). The Append command will fill in any blanks that the AIC file
contains but that the editor has blank.
 Pocket Artist 3 supports full 8-bit selection areas, which allow selections
to have soft or hard borders and antialiased edges. Pocket Artist features
a rich set of tools and techniques to make selections.
Pocket Artist 3 supports full 8-bit selection areas, which allow selections
to have soft or hard borders and antialiased edges. Pocket Artist features
a rich set of tools and techniques to make selections.
All drawing tools
and most image operations are constrained to the current selection. If
there is a selection active, these operations will only affect the areas
of the image surrounded by the selection. The operations that do not
respect the current selection are image/canvas resizing and layer operations.
Below are descriptions of the selection tools.
Selections
Select Rect: selects a rectangular area of the image.
Tap-and-drag in the canvas to define the rectangle. Hold down Shift (HPC)
or Action (PPC) to force the rectangle into a square. The tool options
bar shows the position, width and height of the current selection.
Four buttons define the selection "Combine Mode": Replace, Add, Subtract or Intersect
from the options bar. The fifth button allows you to constrict a selection
either in absolute dimensions (e.g. to always select a 32x32 area), or by a
ratio (e.g. to always select a 1:1 square area).
When Replace is selected, tap inside a selection
and drag to move the selection without modifying it. Tap outside
the selection to remove the current selection and create a new one.
When Add is selected, draw a rectangle anywhere on the canvas to add
the rectangle to the current selection. When Subtract is selected,
any rectangle you draw will be cut out of the current selection. When Intersect is selected and a rectangle drawn, both the previous selection and the new rectangle will be removed. They will be replaced by a selection that contains only the overlap between them.

Select Ellipse: selects an ellipse, and works similarly
to the Select Rect tool. Hold Shift (HPC) or Action (PPC) to force
the ellipse into a circle. Combine Modes work in the same way as Select Rect.
The "line-smoothing" button creates a smooth antialiased border for the selection.
Select Row/Column: select a single vertical or horizontal
segment of pixels. When using Select Row, tap the canvas at the left of the edge
of the line of pixels you would like to select. Drag to the right and release. The vertical position of your stylus will determine the line of pixels selected. The
Select Column tool works similarly. You may use Combine Modes with both tools
in the same way as Select Rect.
Magic Wand: works similarly to the Paint Bucket tool.
Tap in an area of the picture to select a region of pixels of
approximately the same color. The tolerance option determines how
closely pixels must match in color. The "line-smoothing" button will antialias the
edges of the selection based on color deviation. Combine Modes work
in the same way as Select Rect.
Lasso: selects any shape that you draw. Tap in the
canvas and draw a shape in the document to select it. The Smooth
option helps antialias the border around curves and diagonal lines.
Combine Modes work
in the same way as Select Rect.
Select Polygon: selects a polygon that you draw. Tap
in the canvas at each vertex, proceeding clockwise or counterclockwise.
Tap at or near the starting point to close the polygon and select
the area. The "line-smoothing" button antialiases the border of the polygon.
Combine Modes work in the same way as Select Rect.
Deselect: eliminates the current selection.
If the selection is floating, the data is defloated and merged
into the image first.
Layers work like panes of glass stacked on top of each other. Every document begins with a background (base) layer, which has no transparency, much like a sheet of paper. New layers created on top of the document are transparent when created, like glass. Only one layer at a time is Active, and all drawing tools work on this layer. Layers can be easily manipulated by reordering, duplicating and merging them.
 Layers above the base may have Blending Mode or Opacity values other than the default in order to create special effects. They can also be Grouped. If a layer is Grouped, it is clipped by the first layer below it that is not grouped. This is illustrated to the right. Each brush stroke is drawn on a different layer. The red brush on the left is not grouped, and is essentially drawn on its own sheet of glass. The same red brush was used on the right, but grouped with the layer that contained the black brush. Grouping forced the red color to be limited to only those areas of the black brush layer that had been drawn on.
 All tools that manipulate layers are contained on the Layer Toolbar and Layer Window. The Layer Toolbar is shown at the top of the window, and may be shown
or hidden using the View -> Layer Toolbar menu command. The Layer Window covers
the document and can be
shown by tapping the button on the right of the toolbar with arrows pointing up and down.
All tools that manipulate layers are contained on the Layer Toolbar and Layer Window. The Layer Toolbar is shown at the top of the window, and may be shown
or hidden using the View -> Layer Toolbar menu command. The Layer Window covers
the document and can be
shown by tapping the button on the right of the toolbar with arrows pointing up and down.
Layer Masks
 Each layer, in addition to having its own alpha transparency information (which determines each pixel's intensity in the document), can have its own Mask. An alpha mask is essentially a second alpha channel for the layer that is independent of the first, but that works in combination with the layer's own alpha channel. It allows you to change the appearance of the layer while keeping the original layer data intact. For example, giving it soft edges, knocking out a middle section, or to hide portions of a layer without actually deleting its data.
Use the popup menus to add or remove a layer mask. You can also disable the mask, or even show the mask only. Masks are 8-bit grayscale channels, as are any other channels you wish to add to your image. Channels are discussed in Alpha Channels. Masks are (by default) linked to their layer, so moving a layer also moves the mask.
Layer Toolbar
The Layer Toolbar allows you to select the Active layer by using the first listbox. This box says "conduits" in the picture above. Tapping this box will show a list of layers in the document and allow you to select one.
The eye button on the far left indicates layer
Visibility for the Active layer. A layer can
be temporarily removed from the final image
by turning off Visibility. To the right of the
Active layer is the Blending Mode. To the right
of that is the Opacity. The Blending
Mode and Opacity works much like the same controls
for the Paintbrush tool. However, they affect all paint on
the layer at once.
The arrow pointing to the right will open a menu of Layer Operations.
Layer Window
The Layer Window shows a detailed view of all layers in a document.
This is helpful in order to get an overview of the layers and move them around
easily. Each layer is shown on a separate line. Layers higher in the list
are drawn on top of layers lower in the list. The Active layer is
shown with a blue background.
Each line shows the Visibility of the layer, a thumbnail view of
the data in the layer, and the full layer name. Gray and white
boxes represent transparent areas of the thumbnail. The thumbnail
image will be indented if the layer is Grouped.
If the layer has a mask, a thumbnail image of the mask will appear
to the right of the layer thumbnail. If the mask is linked to the
layer, a chainlink graphic will appear between them. If the mask
is currently disabled, a red 'x' will be marked through the mask
thumbnail.
Tap any layer to select that layer to be Active. Tap the
Visibility button to change Visibility. Tap-and-hold on
a layer to change the Grouped attribute. Tap-and-drag a layer
up or down in the list to change its position and therefore when it
is drawn.
Layer Operations menu
This menu is accessed from the arrow button at the far right of the Layer Toolbar.

New Layer: creates a new layer on top of the Active layer.
Delete Layer: deletes the Active layer and any data contained in it.
Duplicate Layer: creates a new layer on top of the Active layer and copies
all data in the active layer to it.
Layer Options: opens a window allowing you to modify the Name of the
Active layer and change whether it is Visible or Grouped.
Layer Mask Add / Remove: adds a layer mask if the layer
does not already have a mask. Removing a mask can optionally "apply" the mask
before discarding, which rewrites the layer's alpha channel to reflect the
mask's contents before the mask is removed.
Merge Down: paints the Active layer onto the layer below it, merging
them permanently using the current Blending Mode and Opacity.
Merge Visible: merges all layers that are Visible without losing data
in layers that are current not Visible.
Flatten Image: merges all layers that are Visible and discards data
from layers that are not Visible. This command may be used to force an image
into one layer so that it may be saved as a BMP or JPEG file.
Select Layer: opens a submenu allowing you to set the selection to
the boundaries of the Active layer. You may also Add, Subtract or Intersect
these boundaries with the current selection.
Alpha channels are a separate "layer" of information in your document.
Instead of a usual multi-color layer containing red, green, blue and
transparency information, an alpha channel contains only one component.
Viewed separate from all other data in your image, it is a grayscale canvas.
Alpha channels are used in several ways: to keep common selection
regions around for later use; to be used in advanced imaging
operations (named "channel ops"); and to perform spot color operations.
Just like the interface for Layers, Pocket Artist 3 features both
a Channel Toolbar and a Channel Window. The Channel Toolbar contains
a list of the channels in the document, and the ability to create
and manipulate channels.

From left to right, the eye icon controls channel visibility.
The combo box contains a list of the channels: the selected item
is the target of any painting and editing operations you
perform. Normally this is set to the RGB channel, which essentially
means that you don't want to adjust an individual channel at this time,
but paint normally on your layers in an RGB mode. Also listed are
the Red, Green and Blue channels which will show a composite
document for only those color components. Below these in the list
are the alpha channels that you have in your image. Finally, if you
are on a layer with a Layer Mask, if will be listed as the last channel.
The buttons to the right of the channel list are follows. Select Channel:
forms a new selection based on the intensity of the pixels in the current
channel. Save Selection: the opposite of select channel, this
button saves the current selection as a new alpha channel. New Channel:
creates a new alpha channel with no content in it.
The next buttons are much like the Layer Toolbar. One toggles the Channel
Window, and the other pops up a menu containing relevant channel functions.
 The Channel Window contains a list of the channels in the document, along
with thumbnails of each item. By tapping on a channel, you are
selecting it to be altered with any painting or editing (including filters).
For example, if you would like to blur just the red parts of an image,
you can select the Red channel, and then perform a Blur Filter operation.
The Channel Window contains a list of the channels in the document, along
with thumbnails of each item. By tapping on a channel, you are
selecting it to be altered with any painting or editing (including filters).
For example, if you would like to blur just the red parts of an image,
you can select the Red channel, and then perform a Blur Filter operation.
Tapping-and-holding on a channel item will also pop up a context menu for the
different functions available to channels: deleting or duplicating the
channel, adjusting channel options, or selecting the channel.
 Channels can also be viewed as overlaid colors on your main image. To
adjust the color and opacity settings for a channel's separate visibility,
use the Channel Options screen. For example, a channel you have set up as
a work area mask could have a red color, and by showing it in addition
to your layer's RGB information, it would display as a masking effect
onscreen, while not needing to dedicate a whole layer to that function.
Channel visibility is also useful in spot color creation. Several channels
could have different mixed colors, and onscreen they would show up as
different areas of color for ink post-processing.
Channels can also be viewed as overlaid colors on your main image. To
adjust the color and opacity settings for a channel's separate visibility,
use the Channel Options screen. For example, a channel you have set up as
a work area mask could have a red color, and by showing it in addition
to your layer's RGB information, it would display as a masking effect
onscreen, while not needing to dedicate a whole layer to that function.
Channel visibility is also useful in spot color creation. Several channels
could have different mixed colors, and onscreen they would show up as
different areas of color for ink post-processing.
 This image represents what the appearance of the document would be
with the "Alpha 1" channel visible in addition to the document. The
Alpha channel is overlaid ontop of the document in a red color at 50% opacity.
This image represents what the appearance of the document would be
with the "Alpha 1" channel visible in addition to the document. The
Alpha channel is overlaid ontop of the document in a red color at 50% opacity.
Pocket Artist is packaged with several image-processing filters. Most
are self-explanatory. Shown
to the right are some of the categories they fit into. Bundled filters
include: Oxidize, Blur, Gaussian Blur, Motion Blur, Scatter, Add Noise,
Despeckle, Reduce Grain, Fragment, Mosaic, Clouds, Difference Clouds, Sharpen,
Sharpen More, Unsharp Mask, Convolve, Emboss, Find Edges, Grayscale, Solarize and Posterize. For Pocket
Artist 3, a software development kit (SDK) is available for
third parties to develop their own plugins for Pocket Artist.
 Most filters have the type of interface shown above - a preview pane
at the top of the screen, with the options to control the filter's
settings below it. At the bottom is a toolbar that controls the preview
pane, which can zoom in and out of the image, as well as toggle the
filter's output to be shown, providing a quick A-to-B comparison of what
the filter's effect would be.
Most filters have the type of interface shown above - a preview pane
at the top of the screen, with the options to control the filter's
settings below it. At the bottom is a toolbar that controls the preview
pane, which can zoom in and out of the image, as well as toggle the
filter's output to be shown, providing a quick A-to-B comparison of what
the filter's effect would be.
 Other filters have more complicated user interface, such as the Convolve filter,
which is more complicated than other
filters. This tool performs a manual convolution of the
image, allowing the user full control over the process.
Other filters have more complicated user interface, such as the Convolve filter,
which is more complicated than other
filters. This tool performs a manual convolution of the
image, allowing the user full control over the process.
A square matrix with
odd dimension (in this case, 5x5) is centered above each source
pixel. The color of the source pixel and pixels around it are multiplied
by the corresponding matrix entry. The sum of these colors is divided by
the sum of all matrix entries, and a shift value is added to create the
resulting color. Interesting presets are included.
 Several parts of this documentation refer to Blenders, Color
Blenders or Blending Mode. They are all discussed below.
A list of blenders that Pocket Artist supports is in the image
to the right.
Several parts of this documentation refer to Blenders, Color
Blenders or Blending Mode. They are all discussed below.
A list of blenders that Pocket Artist supports is in the image
to the right.
Blenders are a way of mixing two colors to create a new one. They can be simple (such as the Normal blender, in which the color on top replaces the color on the bottom), to
complex (such as the Overlay blender, which involves several
factors, giving the appearance of a colored transparency overlay).
Below are descriptions of the blenders. In the descriptions, two
picture layers are assumed. The blenders that the painting tools utilize
can be pictured as having a layer of a solid color (the foreground color)
on top of the picture you are painting on.
Blenders are grouped by their composition type: normal, darken,
lighten, overlays, special and color.
Normal: the top color replaces the bottom, just as if you painted
over the bottom layer with opaque paint.
Darken: yields a color that is the minimum of the
two colors.
Multiply: each color component of the top layer is multiplied by
the bottom color. White will have no affect. Any other color will darken
the bottom color.
Color Burn: uses the top layer's colors to darken
the bottom layer's colors.
Linear Burn: just like Color Burn, but uses simpler mathematics.
Lighten: the opposite of Darken, this blender yields the maximum of
the top and bottom colors.
Screen: almost the inverse of Multiply. Black will have no effect.
Other colors will lighten the bottom color.
Color Dodge: uses the top layer's colors to brighten
the bottom layer's colors.
Linear Dodge: just like Color Dodge, but uses simpler mathematics.
Overlay: combines both Multiply and
Screen to form a blending mode that acts as if the top layer is like a color
transparency that overlays the bottom layer.
Soft Light: the top layer lightens or darkens the image slightly
depending on the brightness of the top layer. This effect takes place for
each color component. It emulates a soft light or shadow of the appropriate
color on the base layer.
Hard Light: the top layer lightens or darkens the image harshly
depending on the brightness of the top layer. This effect takes place for
each color component. It emulates a much harder light than Soft Light.
Vivid Light: like Hard Light, but uses Color Dodge and Burn
effects to achieve a different look.
Linear Light: like Hard Light, but uses Linear Dodge and Burn
effects to achieve a different effect.
Pin Light: like Soft Light, but uses Darken and Lighten
effects to achieve a different effect.
Difference: yields the absolute value
of the difference between the top and bottom layers. Large color differences
are brighter. Similar colors yield a dark result.
Exclusion: akin to Difference, but when the
top and bottom colors approach the same value, the result is gray instead
of black.
Hue: combines the hue of the top color with the saturation and luminosity of the bottom color. Hue indicates
the base color - red, yellow, cyan, etc. Saturation defines how rich or
washed out the color is. Luminosity indicates brightness.
Color: combines the hue and saturation of the top color
with the luminosity of the bottom layer.
Saturation: combines the saturation of the top layer
with the hue and luminosity of the bottom layer.
Luminosity: combines the luminosity of the top layer
with the hue and saturation of the bottom layer.
Glow: combines the color intensity of the top layer
into the bottom layer with a 'glowing' effect akin to a neon light.
Pocket Artist has several other interesting features that are located on the
Image Tools menu.
Place Image
This command will prompt for another image to load, which is then centered with the current document and placed as a new layer. If the
new document is larger than the current document, you can use the Move
tool to pan the new layer around. If the new document is a multi-layer
PSD image, each layer will be added.
Use as Desktop
This is a feature unique to Pocket Artist 3, and only available on older devices. By selecting this option, you can save your work straight to your Windows CE desktop, where it will appear there, optionally tiled. Newer Windows Mobile 2003 (and later) devices can achieve the same functionality by saving your work as a JPEG image, and then opening it up in the built-in Pictures application, and pick "Set as Today Wallpaper" from the Tools menu in that application.
Capture Screen
 Pocket Artist can capture the screen display and copy it
to the program clipboard for pasting into the document.
Picking "Capture Screen" on the tools menu will prompt for
a time delay, at which point you may set up for the capture.
Your Windows CE device will beep when it is capturing your
screen.
Pocket Artist can capture the screen display and copy it
to the program clipboard for pasting into the document.
Picking "Capture Screen" on the tools menu will prompt for
a time delay, at which point you may set up for the capture.
Your Windows CE device will beep when it is capturing your
screen.
Two other commands are located on the Tools menu, and they merit their own chapters:
Batch Processing and Animated GIF Creation.
By tapping Menu Image Tools Batch Processing in Pocket
Artist, it will launch the Batch JPEG Processing wizard that has been introduced in
Pocket Artist 3. This component processes multiple JPEGs as a whole, or
individually (quickly), without having to actually load and save each image into Pocket Artist for
editing. The wizard enables you to perform lossless JPEG transformations, such as rotation
and flipping, as well as lossless cropping, grayscale reduction and image resizing.
The term "lossless" means that the transformations are done without opening the JPEG's
image data and recompressing it, which would result in further image degradation (since
JPEG is a "lossy" format, depending on the quality set when saving an image, some
detail is lost each time a JPEG is produced).
In addition to providing lossless rotation (which the built-in Pocket PC "Pictures" application
can perform), Pocket Artist uses the scratch memory swap files (see Preferences & Memory)
that have been introduced in version 3 to achieve lossless transformation of virtually any
size JPEG. Through the use of this "virtual memory," Pocket Artist can transform images from
the newest digital cameras (such as 15 Megapixel images, which would normally require 45 to 90 MB
of memory to losslessly transform - something that the built-in Pocket PC "Pictures" application
cannot match).
Batch processing also includes a step to set image captions for an image or a group of images.
This is especially useful when you wish to tag a set of JPEGs with the same data, such as
Author or Copyright information.
 The Batch Processing wizard starts out by prompting for a file or folder to use. It uses
the same Image Browser that is featured in Pocket Artist's "Open" prompt. To select a
single JPEG image, simply tap the "Select All" command on the bottom toolbar. Any folder
on the mobile device can be opened, as well as ones that have been network-mapped.
The Batch Processing wizard starts out by prompting for a file or folder to use. It uses
the same Image Browser that is featured in Pocket Artist's "Open" prompt. To select a
single JPEG image, simply tap the "Select All" command on the bottom toolbar. Any folder
on the mobile device can be opened, as well as ones that have been network-mapped.
 Next, Pocket Artist will prompt for where to Save the output images. You can overwrite
the existing images by tapping OK at this prompt, or choose a different folder from this
screen. If you have picked a whole folder to process, a folder prompt will appear (shown); otherwise
a standard "Save" prompt will appear that asks for the file name and location.
Next, Pocket Artist will prompt for where to Save the output images. You can overwrite
the existing images by tapping OK at this prompt, or choose a different folder from this
screen. If you have picked a whole folder to process, a folder prompt will appear (shown); otherwise
a standard "Save" prompt will appear that asks for the file name and location.
After picking a source and destination for processing, and you have picked a whole
folder to process, Pocket Artist ask to process each image
individually, or all of them as a whole. If processing as a whole, the transformation
interface (below) will only appear once, and the transformations will be applied to each
image in the batch. In addition, the Edit Captions screen will appear only once, and will
apply to each image as well.
 The next screen that appears is the first half of the Batch Processing wizard; it displays
a thumbnail of your graphic along with commands at the bottom. The "Transform" menu contains
items such as rotation and flipping commands. More operations are located on the "Options"
popup menu, such as Grayscale Reduction and Resize To Fit commands. To crop and image,
drag an area on the image itself, and it will be highlighted. To continue with the transformation,
tap OK at the top of the screen.
The next screen that appears is the first half of the Batch Processing wizard; it displays
a thumbnail of your graphic along with commands at the bottom. The "Transform" menu contains
items such as rotation and flipping commands. More operations are located on the "Options"
popup menu, such as Grayscale Reduction and Resize To Fit commands. To crop and image,
drag an area on the image itself, and it will be highlighted. To continue with the transformation,
tap OK at the top of the screen.
 The next screen that appears after image transformations is the Edit Captions interface
to add and adjust captions (see IPTC Caption Editing) for the image(s).
When working in batch mode, only enter fields you would like to store into every JPEG;
empty fields will not be affected.
The next screen that appears after image transformations is the Edit Captions interface
to add and adjust captions (see IPTC Caption Editing) for the image(s).
When working in batch mode, only enter fields you would like to store into every JPEG;
empty fields will not be affected.
The interface is exactly like the caption editor normally
used for the current image document in Pocket Artist, though it contains an extra
"Cancel All" command when working on images individually; tapping that command will
cancel out of the batch processing mode all together. Tapping "Cancel" will not perform
any caption edits on the current image, and (if editing individually) will proceed
to the next image.
After finishing with the transformation and captions interfaces, batch processing
of the JPEGs will be finished, and the processed results will be in the destination
folder you specified in the first step.
Pocket Artist 3 has introduced the ability to create animated GIF files, normally
used for websites and emails. Tap Menu Image Tools Create Animation to
launch the Animated GIF wizard.
As Pocket Artist is generally used for pixel-level editing,
Pocket Artist does not perform more advanced animation techniques such as tweening or
interpolation. Animations are built around frames, which you create with the animation
wizard. Each frame of an animation is the result of a different combination of layer
visibility. Therefore, each frame of your animation needs to exist as a
layer or combination of layers in your image.
 The first screen that is shown after tapping "Create Animation" is the interface to create a new color palette for the
current image document. Instructions on how color palettes are created can be found
on the Opening/Saving chapter.
The first screen that is shown after tapping "Create Animation" is the interface to create a new color palette for the
current image document. Instructions on how color palettes are created can be found
on the Opening/Saving chapter.
Since the palettes that are created are based on this opening image,
you will want to set layers to be visible in a way that reflects all the frames'
colors as a whole.
 After setting a color palette for the animated GIF, the Animation Frames screen appears.
At the top is a "filmstrip" view of each frame in your animation. Below it are the
adjustments that can be made to the selected frame. At the bottom are commands
for adding new frames or saving the filmstrip data.
After setting a color palette for the animated GIF, the Animation Frames screen appears.
At the top is a "filmstrip" view of each frame in your animation. Below it are the
adjustments that can be made to the selected frame. At the bottom are commands
for adding new frames or saving the filmstrip data.
Tap "New Frame" at the bottom of this screen to create a new frame in the animation.
A new screen will appear in which you can specify which layers to have visible in that
frame. Since GIF animations can reset the display to the "previous image" after displaying
an animation frame (explained below), most of the time this will be just one layer per frame.
Tap OK from the layer visibility screen to create the new frame, and it will be added
to the filmstrip.
Frames can be removed or reordered in the filmstrip by tapping-and-holding on the frame,
and picking either Remove, Move Back or Move Forward from the popup menu that appears.
Pocket Artist provides a quick way to add each layer of the image as separate frames
in the animation by tapping the Frames Add All Layers command.
The Delay and Clear attributes are advanced settings in the animation.
The Delay setting refers to the length of time you wish the current animation to
appear onscreen. The Clear setting refers to how the animation display should clear
the frame after it is shown. The default keeps the frame onscreen. This
is useful with "background" information, and for animation frames that appear ontop
of one another; the next frame will be drawn ontop of the current frame. The next option
is to clear the frame completely. This will result in the next frame being shown
by itself, as though it were a standalone GIF image. The final option is to
clear the current frame with the previous image in the animation. This is
very useful for many animations.
For example, to have an animation of a ball moving
back and forth on a tennis court, you could have the court be the background layer
of your document, and have a bunch of layers in the image for the different positions
of the ball. Then, using the Add All Layers command, set all frames to the "clear
to previous image" setting. This will initially display the court, and then the
ball frames will display, with each frame resetting itself to the court image before
the new ball location is drawn.
Also available on the Frames popup menu is the ability to Load and Save your
filmstrip. This does not save the image itself, but saves the information about
the frames, such as the layer visibility, delay and clear settings. It helps when
creating an animation you might retouch later, since frame creation can be
time consuming.
Tapping OK on the Animation Frames screen will finally prompt for a GIF file
to save your animations on. After saving the image, Pocket Artist will return to
the main screen and the animation wizard will be closed.
User Preferences
User Preferences are divided into general options, stylus options, and file associations. The default for all options is checked and should normally be used. On the general options tab you will find the following items:
General tab:
- Antialias paintbrush strokes: draws the paintbrush on a subpixel
level to create a smooth looking stroke. Disable to speed up paintbrush operations at the cost of visual quality.
- Utilize brush spacing information: honors minimum spacing for each
'stamp' of a brush while drawing. This is used to create special effects with some brushes. Disable to always create a smooth stroke.
- Perform Zoom-to-Fit upon Load/New: whenever opening a document, zoom in or out to fit the document within the canvas area. Disable to always load documents at 100% zoom.
- Remember tool settings / Reset: whether to save the settings of the different tools, such as opacity, sketching mode and tolerances.
- Use memory caution when loading/saving: Pocket Artist does its best to predict when there might be memory problems during an editing session. As a result, it may report that it cannot load certain images into memory, when in fact it might indeed be able to, given that there aren't going to be major edits done to the image (such as level or hue adjustment, full-canvas gradients, etc). Disabling this checkbox will bypass the advanced memory warning prediction, but might have side effects while editing.
- Undo tool function: customizes the Undo tool button on the main toolbar to perform a variety of functions.
Editing tab:
- Use additional stylus movement data: use the device hardware to correctly interpolate the full path of fast stylus movements. Disable if rapid stylus movement creates inaccurate results on your device.
- Reduce stylus jitter: average a number of points during drawing tool
movement to smooth the behavior of the tool. This helps counteract the tendency
of stylus input devices to produce random variations in signals. You may select the Number of Points to be averaged. This determines how much smoothing is performed. Disable or reduce Number of Points if rapid stylus movement produces inaccurate
results.
- Snap to stylus release point: only takes effect if Reduce stylus jitter
is selected. This option forces the release point to be unaveraged, and is
recommended. Turn the option off if you plan to always hold the stylus at the release point for half a second.
- Undo levels: controls the number of undo steps you wish to retain, when memory permits.
Buttons tab:
- Here you can map buttons and keys to functions and tools within Pocket Artist 3. First, select the function at the top of the screen, and then press the hardware button which you would like to map to that function. To unmap a button, or reset all button mappings, tap-and-hold in the mapped button list, and a popup menu will appear with the relevant commands.
Guides / Grid tab:
- Choose the size and colors of the Grid and Guides, which are displayed on the image when you tap View Guides or View Grid.
Associations tab:
- Choose whether Pocket Artist is associated with PSD, JPEG, GIF, BMP, PNG and 2BP files.
 The Memory tab controls the current memory settings and constraints you would like to place on Pocket Artist.
The first item, the "reserve for system" value, should normally be around 512K. Pocket Artist generally "eats up" as much memory as space will allow when opening large images and during editing (especially if you have a lot of Undo Levels being retained). It will stop using program memory at this 'reserved' mark.
The Memory tab controls the current memory settings and constraints you would like to place on Pocket Artist.
The first item, the "reserve for system" value, should normally be around 512K. Pocket Artist generally "eats up" as much memory as space will allow when opening large images and during editing (especially if you have a lot of Undo Levels being retained). It will stop using program memory at this 'reserved' mark.
Scratch files: Pocket Artist 3 has introduced the ability to open and edit images beyond the capacity of your RAM by utilizing scratch memory "swap files" on a memory card. As Pocket Artist is used, memory is allocated normally, and as a limit is reached, these scratch files are created and store image data. Check the "Enable" box to use scratch files, and pick a storage card location.
Scratch size: the architecture of Windows Mobile does not lend itself to scratch files that grow and shrink over time (as desktop Windows does with its swap file). Therefore, scratch files are allocated in "chunks" on the storage card. Two megabytes is a good value for these chunks, and in most cases you will want to leave the value at that. Increasing this value does not increase the amount of scratch space available (that would be the free space on your storage card); it will simply create fewer scratch files on your storage card (since each one holds more data), and can lend to increased overall performance.
This section of the product documentation provides some tips and advanced usage
for Pocket Artist, and will expand as users contribute. If you
would like to submit a tip, email artist@conduits.com.
Enthusiasts are also encouraged to contribute to documentation
on how to create interesting effects -- tutorials and how-to's on
mastering all the features of Pocket Artist for a richer creative
experience.
If you are interested in contributing, please
email artist@conduits.com.
Tutorials will be placed in the Artist's Corner section.
Application buttons can be mapped in the Preferences screen.
Default Keyboard shortcuts are as follows:
- 0-9: Adjusts opacity for current tool, or layer
- Up/Down/Left/Right: Nudge Selection
- B: Brush
- C: Copy Tool
- E: Eraser
- F: Toggle Full Screen
- G: Smudge
- H: Toggle Selection Outlines
- I: Eye Dropper
- J: Air Brush
- K: Paint Bucket
- L: Lasso
- M: Square Selection tool
- N: Pencil
- O: Dodge Burn
- R: Blur Sharpen
- S: Rubber Stamp
- T: Text
- V: Move Tool
- W: Magic Wand
- X: Swap Foreground/Background Colors
- Z: Zoom Tool
- Ctrl+A: Selects All
- Ctrl+B: Brightnes and Contrast
- Ctrl+C: Copy
- Ctrl+D: Deselects
- Ctrl+Shift+D: Feather Selection Menu
- Ctrl+F: Fill Menu
- Ctrl+I: Inverts Colors
- Ctrl+Shift+I: Inverts Selection
- Ctrl+M: Curves
- Ctrl+N: New Document
- Ctrl+O: Opens file
- Ctrl+S: Saves current file
- Ctrl+V: Paste
- Ctrl+X: Cut
- Ctrl+Z: Undo/Redo
 |
|
|
|
|
© Copyright 2010 Conduits Technologies, Inc. All Rights Reserved.
Big thoughts in small spots.
Conduits develops Pocket PC, Handheld PC and Windows Mobile software
for devices such as the HP iPAQ, Dell Axim, Palm Treo 700w and Pocket PC Phone Edition.
Questions or comments about our website? Let us know.
|
|
|